Thursday 31 January 2013

Cleaning session 5

Having removed the hand crank I was now able to access the balance wheel. Removing the screw below allowed me to remove the balance wheel from the machine.


Having read about the 'Clamp stop motion clamp washer' on other blogs, I knew it was important to photograph its exact position relevant to the balance wheel and whilst still on the machine (see below):
 

The reason for this is because it does have a fixed position and once removed for cleaning you will easily forget or place it in the wrong position later.


Like new ^_^


Next, was the bobbin winder bracket...


Again, just one screw releases the whole thing:

Here, I didn't want to mess with it too much and just took off the friction ring and gave it a good clean with metal polish.


All cleaned up.


Cleaning session 4

Next up was the hand crank itself. Loosening just one screw will allow you to detach the hand crank in its entirety.


Taking off the 'Hand attachment body bracket', I could give the hand crank a thorough clean. Having consulted a different 'List of parts' handbook that I found on the internet, I deduced that I was probably missing Simanco parts 94041 and 94039 (a piece of rawhide apparently).


This is it all cleaned up.


Wednesday 30 January 2013

Cleaning session 3

Today, I decided to tackle the stitch indicator plate.


Polished up nicely ^_^ (There are a couple of hairs on the stitch indicator plate - not scratches)


Cleaning session 2

The next simplest looking part seemed like the needle bar and presser foot.


I dismantled these pieces and gave them a good cleaning with metal polish. If you are doing this, then remember to lower the presser foot so that you have access to as much of the bar as possible when cleaning. A similar technique is needed when cleaning the 'Needle bar' - turn the crank handle to access as much of it as possible.


These bits polished up nicely ^_^


Next up was this plate:


Not bad - note the difference!


The plate on the right side of the base unit cleaned up well too!


Tuesday 29 January 2013

Cleaning session 1


This is the first piece that I decided to clean. It was already detached from the wooden base unit as the thin strip of wood that it screwed into had broken off in transit.

Firstly, I do not know the name of this part and cannot find it in the 'List of parts' manual. Secondly, only one of the five parts has a part number (Simanco 124387) - the others do not. It appears to be some kind of latch that secures the sewing machine to the base unit.

When cleaning it, the rubber/leather piece embedded in one end of the Simanco 124387 piece (see below) was so mangled and covered in muck that I decided to take it out. You can see my screwdriver head pointing at it below:


If anyone out there has a replacement for this then PLEASE let me know!


Update

I have used MAAS metal polish to clean some of the above parts and am quite pleased with the end result (see below):


The next part to be cleaned was this one:


Although it is pretty clean to start with, I am giving everything the once over, whilst at the same time trying to identify the part numbers and name them.


(After cleaning)


Monday 28 January 2013

Singer 99k-31 Restoration Project (Phase 1)


Introduction


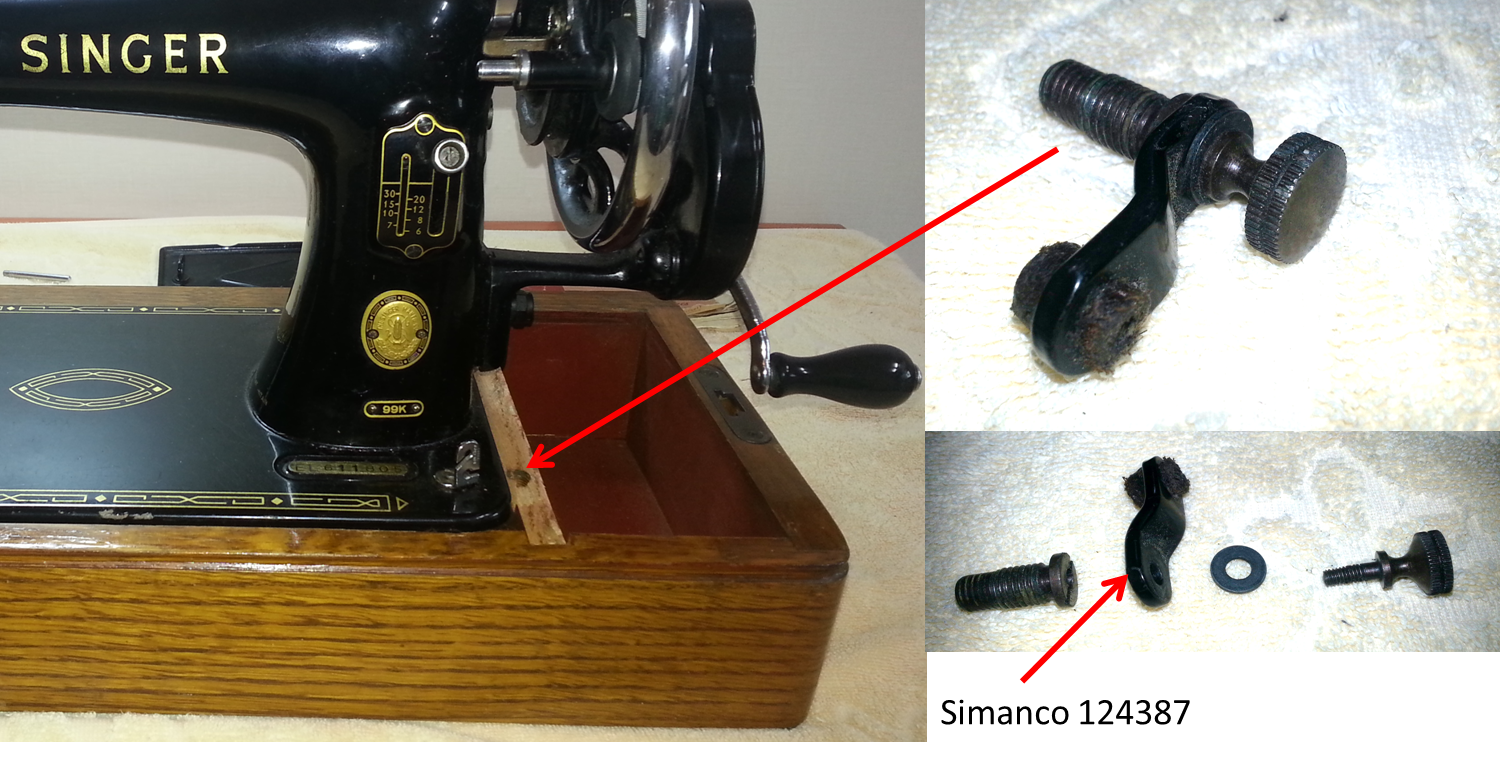
I recently bought a Singer 99k-31 model (see above). It was manufactured in 1956, has a reverse feature, and is operated by a hand crank mechanism.

This is my first ever Singer sewing machine and I am very proud to finally own one of these little (but heavy) beauties. I am looking to clean it up and restore it to its former glory before using it but do not know where to start :(

I am hoping that there will be people out there with the knowledge and know-how to help me along my journey. I am posting a few pictures and would like to know if there are any parts missing. If anyone out there has one, has restored one, is a Singer expert, or has a keen eye then please help me in looking for any missing parts.

Thank you kindly in advance.


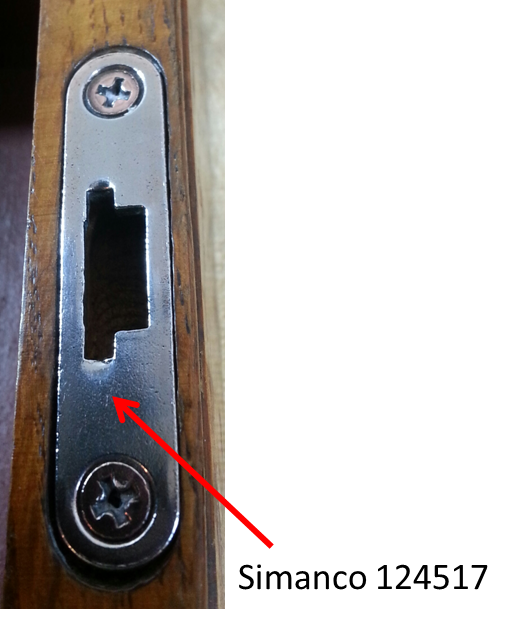
In the two pictures above (with the pencil) I spotted something that seems amiss! I found a very small rectangular piece of metal that looks like it could fit to the 'hinged finger' (as it is called in the instruction manual) but I do not know what should have been there originally. If someone could please help me out with this, I would be very grateful.

That's all for now folks ^_^